|
| Shining Force III Walkthrough - Scenario 2 -
|
| Thief Maps
|
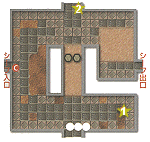 | Items
1. - Healing Drop
2. - Silver Ring
|
| Enemies | HP | MP | ATK | DEF | AGL | LCK | SPD | EQUIPPED | MAGIC | SPECIALS | ITEM | GOLD |
| Thief | 20 | 0 | 11 | 6 | 18 | 3 | 6 | Steel Sword | - | - | - | 85 |
젨젨쟔end one of your slower characters to open the chest and recover the healing drop near where your force starts. Send your faster characters across the sand and destroy the barrels to catch up with the thief to steal the treasure from him once he's opened the locked chest.
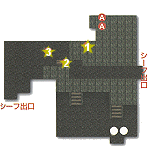 | Items
1. - Large Mithril
2. - Healing Drop
3. - Protect Ring
|
| Enemies | HP | MP | ATK | DEF | AGL | LCK | SPD | EQUIPPED | MAGIC | SPECIALS | ITEM | GOLD |
Thief
x 2 | 20 | 0 | 11 | 6 | 18 | 3 | 6 | Steel Sword | - | - | - | 85 |
젨젨쟔end your force to the furthest ramp if you want to catch up with the thieves but send one character down into the section between the two raised areas of ground to guard the second exit. Getting the items from the chests is just a matter of catching up to the thieves and attacking them, to make them drop the item they have taken.
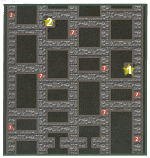 | Items
1. - Large Mithril
2. - Black Ring
|
| Enemies | HP | MP | ATK | DEF | AGL | LCK | SPD | EQUIPPED | MAGIC | SPECIALS | ITEM | GOLD |
| Thief | 32 | 0 | 23 | 19 | 30 | 3 | 6 | Steel Sword | - | - | - | 320 |
Skeleton
x 7 | 23 | 0 | 20 | 16 | 15 | 5 | 5 | Steel Sword | - | - | Antidote Herb | 70 |
젨젨쟕he thief will open the first chest before you can get to it so send one fast character in pursuit of him and another heading towards the second chest. Plan your route carefully and don't let the skeletons block you. Send as many of your force into the ruins as you can afford to.
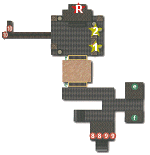 | Items
1. - Rune Tomahawk
2. - Large Mithril
|
| Enemies | HP | MP | ATK | DEF | AGL | LCK | SPD | EQUIPPED | MAGIC | SPECIALS | ITEM | GOLD |
Thief
x 2 | 38 | 0 | 32 | 24 | 36 | 3 | 6 | Steel Sword | - | - | - | 460 |
Assassin
x2 | 36 | 0 | 34 | 23 | 18 | 3 | 6 | Steel Sword | - | Poison
Attack | Healing Drop | 330 |
Hell Hound
x 2 | 28 | 0 | 31 | 22 | 20 | 3 | 6 | - | - | Paralyse Attack | Fairy
Powder | 270 |
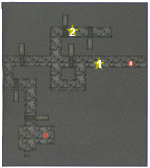
젨젨쟛ou will need Zero to complete these ruins. Don't send all your characters into the ruins as you don't want to leave Medion on his own when the assassins and hell hounds come out of the ruins. First fly Zero to the two walls with jewels on them. Inspect the northern jewel first to open the first gate so your characters can move onto the sand. Then inspect the southern jewel the next turn to open the second gate. To activate Robby, make whoever's carrying the Robby eye use the item on him. Robby will awaken and then join the force.
 | Robby |
| Starting Stats |
| Level | 3 |
| HP | 36 |
| MP | 0 |
| ATK | 39 |
| DEF | 30 |
| AGL | 12 |
| LCK | 4 |
| SPD | 5 |
 | Items
1. - Goddess Tear
2. - God Rapier
|
| Enemies | HP | MP | ATK | DEF | AGL | LCK | SPD | EQUIPPED | MAGIC | SPECIALS | ITEM | GOLD |
| Thief | 62 | 0 | 58 | 42 | 50 | 3 | 6 | Great Sword | - | - | - | 1500 |
젨젨쟋ove the character with the highest agility onto the panel on the floor which has a purple circle on it. this will open all the stone doors in the map. Move the rest of your characters along the passageway to catch up the thief. You need a character with a ranged attack to get the last treasure from the thief because you can't hit him with a normal attack as the only spot next to him once he's opened the chest is a square that your characters can't stop on. Once the doors are open the thief will escape the next turn so make sure you have someone behind the doors with a ranged attack before you open them (that is, of course, if you trapped him to stop him escaping).
 | Items
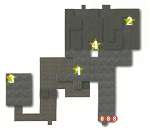
1. - Nimble Ring
2. - Crystal Rod
3. - Dark Matter
4. - Small Mithril
|
| Enemies | HP | MP | ATK | DEF | AGL | LCK | SPD | EQUIPPED | MAGIC | SPECIALS | ITEM | GOLD |
Thief
x 3 | 62 | 0 | 58 | 42 | 50 | 3 | 6 | Great Sword | - | - | - | 460 |
| Blood Born | 58 | 0 | 60 | 48 | 22 | 5 | 5 | Great Sword | - | Paralyse Attack | Fairy Powder | 900 |
젨젨쟔end Zero off to retrieve the Dark Matter while the rest of the force rushes forward. Take the Nimble Ring from the thief once he's opened the chest. Kill the Blood Born and intercept the thief who tries to make off with the Tiamat Rod - attacking him after he's opened the chest.
|
|

